Division of Biology and Medicine
BioMed Core Facilities

Zeiss LSM 880 Confocal Laser Scanning Microscope

Optical sectioning of samples labeled with fluorescent indicators

Overview

Laboratories for Molecular Medicine, Room 133 

LSM880

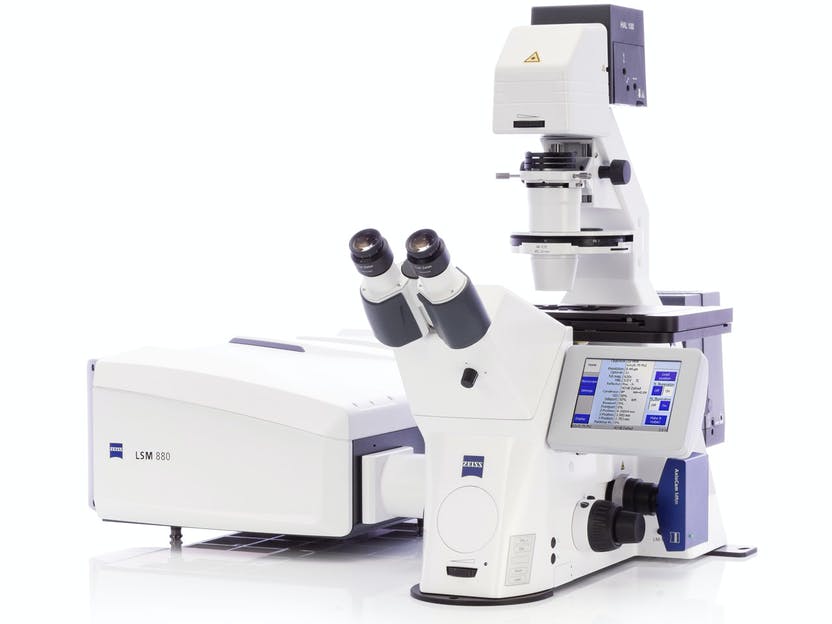
The Zeiss LSM 880 confocal laser scanning microscope is designed for imaging fluorescence, either in fixed or live samples. A pinhole removes the out-of-focus light and allows investigators to acquire thin optical sections at various focal planes. Stacks of images can be acquired for 3D visualization.

Operation

Scanhead.  The system has a Quasar module scanhead - 32 channel GaAsP detector and two flanking multialkali PMTs. The 32-channel spectral detector allows unmixing of multiple dyes on-the-fly with a scan of a single frame. Two additional channels can be acquired with the flanking detectors optimized for imaging in deep blue or far red spectra. Both the spectral GaAsP and far-red MA PMT are liquid-cooled keeping the noise very low and thus increasing sensitivity of the system.

Lasers. The system has a unique set of lasers. Besides the typical Argon laser (458/488/514 nm for CFP/GFP/YFP), diode 561 nm laser and a He-Ne 633 laser, the system is also equipped with the HeNe 594 nm laser (mCherry, mPlum), and pulsed high-power 405 nm and 440 nm lasers that can be used for ablation and photoactivation.

Objectives. This LSM 880 has a set of premium objectives for a broad range of applications:
LD C-Apochromat 40x/1.1 W Corr UV-VIS-IR. This objective has a unique working distance of ~600 um for imaging large volumes, e.g. cleared specimen.
Plan-APOCHROMAT 100x/1.4 Oil Ph3. An objective for fluorescence and phase contrast imaging
Plan-Apochromat 40x/1.3 and 63x/1.4 Oil DIC UVVIS-IR. Both lenses are routinely used for high-resolution imaging and are corrected over a broad range of spectral lines from UV to IR.
Finally, two highly corrected air (no immersion) objectives Plan-Apochromat 20x/0.8 WD=0.55 M27 and Plan-Apochromat 10x/0.45 WD=2.0 M27.

Resources

Zeiss

Reservations

1. Go to our facility's iLab site: ILABS
https://brown.ilab.agilent.com/service_center/show_external/5278/bioimaging_facility
2. In the upper-right-hand corner of the screen click ‘Sign In,’ and select to sign in using Brown University credentials 
3. You will be directed to an authentication page where you will enter your Brown University credentials
4. Once you have entered your credentials, click the ‘Login’ button
5. You will be directed to an iLab Registration page where you will select your PI/Lab and verify your contact information. 
6. Once your registration has been submitted, your PI will receive a notification that you have requested membership to their lab in iLab.  They will need to approve your membership.
7. Your training status needs to be updated.  This is done on a rolling basis by Eric Olson (Eric_Olson@brown.edu) and Sandra Van Wagoner (sandra_van_wagoner@brown.edu).   Alternatively, you can email Geoffrey_Williams@brown.edu or Robbert_Creton@brown.edu asking for an update of the training status in iLab, listing the microscopes that you have been trained on in the Bioimaging Facility. 

When registration is completed (including step 6-7), you can schedule equipment using the iLab calendars.
1. Navigate to the core page: ILABS BIOIMAGING
    https://brown.ilab.agilent.com/service_center/show_external/5278/bioimaging_facility 
2. In the upper-right-hand corner of the screen click ‘Sign In,’ and select to sign in using Brown University credentials
3. You will be directed to an authentication page where you will enter your Brown University credentials
4. Once you have entered your credentials, click the ‘Login’ button
5. Select the Schedule Equipment tab and click on the ‘View Schedule’ button next to the instrument of interest. Click and drag on the time frame you would like to schedule your reservation for.
6. A window will pop up that will allow you to verify your reservations details and provide payment information before saving the reservation.

When it is time to use the microscope

1.  Open iLab and select 'Go to Kiosk'
2.  Start end End microscope session (Start is needed to run the microscope) 

Additional help

More detailed instructions can be found on the Help Site by clicking on the “HELP” link in the upper right hand corner. For any questions not addressed in the Help site, click on the “HELP” link in the upper right hand corner and submit a ticket, or email ilab-support@agilent.com.

Contact